UPV-3
Lubricant Filling Instructions TSS-01-0019
Preface:
As the machine tool usage time increases, the performance of the lubricating grease on the surface of the ball screw and linear guide rail will gradually deteriorate in nature, leading to a decrease in lubrication performance. In addition, due to the gradual overflow of lubricating grease inside the ball screw nut and linear guide slider with stroke movement, and the influence of the usage environment, it can also cause the lubricating grease to become dirty or foreign objects to mix in. Therefore, it is necessary to supplement the lubricating grease according to the frequency of use.
The reduced performance of lubricating grease will affect the accuracy and lifespan of ball screws and linear guides. Under normal circumstances, please add lubricating grease to the machine tool every 36 months.
Warning: When adding lubricating grease, please be sure to press the emergency stop button with a lock to prevent accidental start-up of this device due to operations elsewhere. If maintenance cannot be carried out while pressing the emergency stop button with a lock, please handle it in advance to ensure that the machine tool axis does not move before proceeding with maintenance work. In order to ensure that other personnel do not operate the machine during maintenance work, please show a prominent sign in front of the machine indicating that maintenance work is being carried out or that it is prohibited to operate the machine.

Comment:
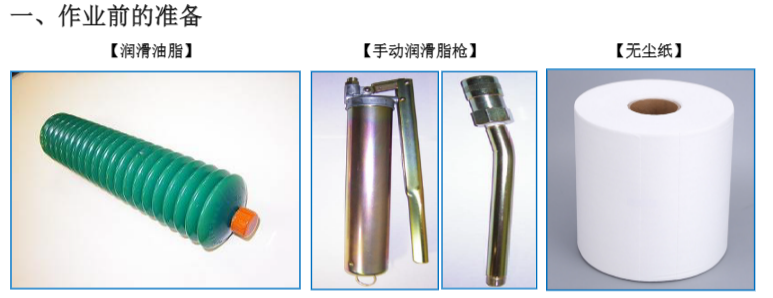
1. Lubricating grease: Please use Albanian lubricating grease S No.2 produced by Showa SHELL Petroleum Co., Ltd
Lubricating grease part number: Y111Z0000669 ALVANIA GREASE S2 (400g)
2. Manual grease gun: capacity 400cc
Grease gun part number: Z339F0800000 CH-400
Oil gun nozzle part number: Z339S010070 CNP-2
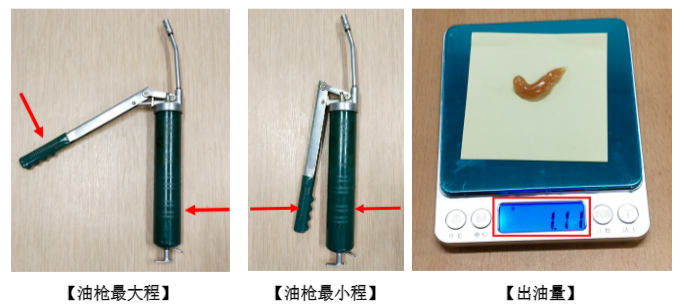
Explanation of oil output:
The handle of the oil gun is compressed from the maximum range to the minimum, and the amount of oil squeezed is about 1.0g

2、 Steps taken (X-axis, Y-axis, U-axis, V-axis
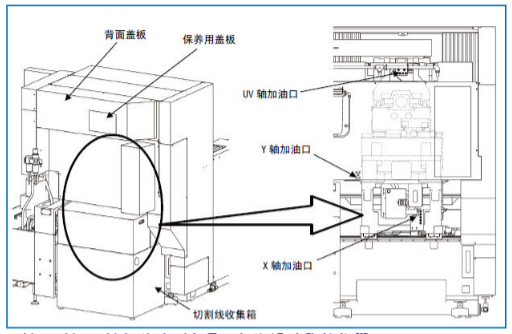
(a) Take out the cutting line collection box and you can see the oil filling ports on the X-axis and Y-axis (please refer to the figure below).
(b) Remove the cover plate above the back of the machine or the cover plate used for maintenance and repair, and you can see the oil filling ports of the U-axis and V-axis (please refer to the figure below).

(c) Move the X-axis, Y-axis, U-axis, and V-axis of the machine tool to positions where it is easy to add lubricating grease.
(d) Clean the oil filling ports of the X-axis, Y-axis, U-axis, and V-axis of the machine tool with dust-free paper (as shown in the following figure).

(e) Add lubricating grease to the X-axis, Y-axis, U-axis, and V-axis, and add approximately 4g of lubricating grease to each refueling port (as shown in the following figure)
Attention: Each refueling port is filled with 4g of lubricating grease in 4 times to complete the filling. Firstly, each refueling port is filled once (about 1g of lubricating oil). Move the X-axis, Y-axis, U-axis, and V-axis back and forth 2 or 3 times throughout the entire process to evenly distribute and penetrate the lubricating grease.
Cycle this step 4 times to complete the addition of lubricating grease.

(f) After adding lubricating grease, use a dust-free paper to clean the excess grease at the oil filling ports of the X-axis, Y-axis, U-axis, and V-axis.
(g) Replace the removed cover plate and cutting line collection box in their original positions.
3、 Steps of homework (Z-axis)
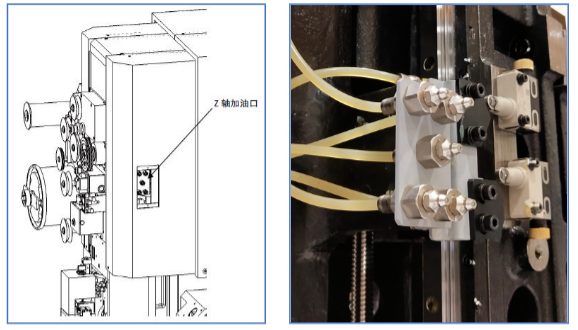
(a) Remove the small cover plate on the right side of the Z-axis and move it to the height where the fuel filler can be seen from the window (as shown in the following figure).

(b) Clean the Z-axis oil filler with dust-free paper.
(c) Add lubricating grease to the Z-axis, and add approximately 4 g of lubricating grease to each oil inlet (as shown in the following figure).

Attention: Each refueling port is filled with 4g of lubricating grease in 4 times to complete the filling. Firstly, each refueling port is filled once (about 1g of lubricating oil), and the Z-axis is moved back and forth 2 or 3 times throughout the entire process to evenly distribute and penetrate the lubricating grease.
Cycle this step 4 times to complete the addition of lubricating grease.
(d) After adding lubricating grease, use a dust-free paper to clean the excess grease at the oil inlet of the Z-axis
(e) Install the removed cover plate in its original position